

How To Put Images On Your Green Screen
How to use a light-green screen.
Get advice from the pros on how to properly light your screen and subject. Then contain your new background prototype seamlessly using the Ultra Key tool in Adobe Premiere Pro.
Picture anywhere, in or out of this earth, with a dark-green screen.
Greenish screen or blue screen video shoots can be game changers for creating live-movement projects involving custom backgrounds or for compositing in special furnishings worthy of Hollywood. Shooting with a green screen involves filming a person or adding visual effects in forepart of a solid colour. Then, by digitally removing or "keying out" that color, you can driblet that scene onto the background of your option in post-production. Removing the colored background is also referred to equally "chroma keying."
Why do we utilise a green background? It doesn't match any natural skin tone or hair colour, and then it's easy to remove without grabbing parts of the person in the foreground. Only if yous're trying to match a lower-calorie-free background, or yous need to take a green prop in your projection, a blue screen works best.
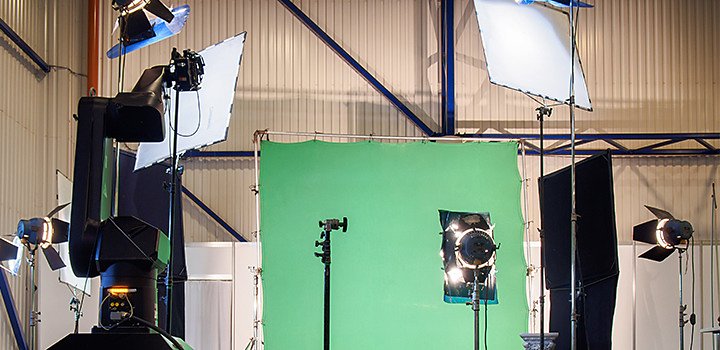
Lighting your green screen properly is the key to easy "keying."
Shooting on a dark-green screen can save y'all time and resource, simply it only creates more work if it's done incorrectly. First, make sure your greenish screen is as flat and polish as possible. Then, concentrate on lighting your green screen thoroughly. And, if you tin can, shoot in loftier resolution.
Kickoff light your screen, then your subject.
The biggest mistake you can brand with green screen piece of work is lighting the screen and the subject equally i. For a colored background or "blush" that is hands keyed out, calorie-free your screen first. "Information technology needs to be every bit evenly lit as possible at about 40 to l percentage luminance," says production head Mitch Apley. Aim for diffused, nondirectional lighting that hits your screen from above. You will need multiple loftier-quality lights ready just to light the room and screen. Try measuring the lighting on your screen with a waveform monitor; y'all'll know the green screen is lit well when you come across a flat line going across the monitor.
A "green screen kit" is not your friend.
Cheaper green screen kits you can buy online are not going to cut it on their own. These types of kits typically include ane or two lights sufficient to light your subject just, which will create a patchy background that will be fourth dimension-consuming and difficult to remove in your video editor. "That kit seems like information technology'south solving all your problems, but it'due south introducing an entire earth of new issues," says producer and director Martin Vavra.
The best types of lights for green screen footage.
Vavra recommends renting 2 m-watt lights for lighting the screen itself and a method for diffusing, like softboxes, to put around them. Next, get a 650-watt light and a 500-watt light, again with improvidence through a softbox or even white bedsheets. These should be used to low-cal the subject of your video. You may also want to employ a pilus light to create a sharper line between your subject field and background. "As a beginner, it's worth renting that hundred or then dollars' worth of lights. Just making that conclusion volition save your project," says Vavra.
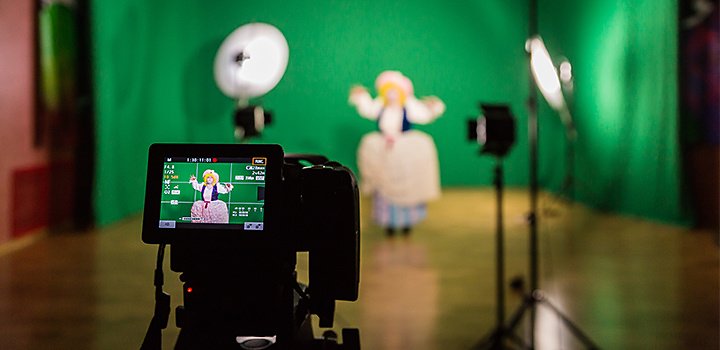
Preparing your subject for the green screen.
Knowing what type of footage yous'll be using for your new background volition tell you how best to light the objects or people in front of your greenish screen. Videographer Gerry Holtz says, "What kills a light-green screen composite is if there'southward sunlight from the left in the background shot, and you lit them from the other side. There'south no way to make those two things await right."
Have every bit much space betwixt the subject area and the light-green screen as possible.
Keeping your subject equally far from the green screen as possible will help y'all accurately mimic the lighting in your new background clip. Plus, it volition help forbid green tones from spilling off the screen and onto the edges of your discipline. Aim for about ten to xv feet of altitude between your bailiwick and the screen.
Call up, if information technology's dark-green, it'due south going to become abroad.
If someone shows up in a green tie, the Ultra Key tool in the video editing software will blast a pigsty through their chest. Look out for colors that have just a hint of green too. "I've seen people show upwards wearing khakis that are slightly dark-green. What happens is they look semi-translucent," Apley says. Mirrored or cogitating objects tin also exist a problem. Bring makeup pulverisation to go rid of shine on the face or caput.
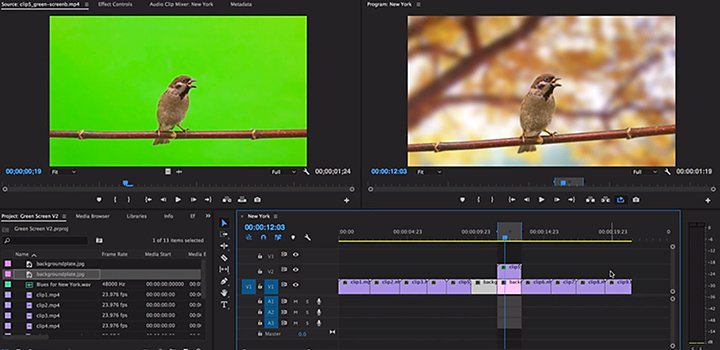
Adding your background image to your green screen video.
Once your green or blueish screen video clip is filmed, you're ready to use a video editing program or green screen software to remove the colored background and add together in your new scene. Follow these tips to ensure a smoothen edit in Adobe Premiere Pro.
Lock in your content before keying out the footage.
Before yous spend fourth dimension editing out your greenish screen groundwork, or even doing color correction on your footage, complete a rough edit. Y'all don't desire to spend time doing these complex tasks on frames that won't make the last cutting.
Use the Ultra Key tool.
One time your footage is narrowed down, use the Ultra Primal tool in Adobe Premiere Pro to key out the background. Open the Effects panel so the Ultra Key tab. Employ the Eyedropper tool to choose your primal color, selecting an area on the greenish or blue screen. If you're lucky, this volition do most of the piece of work for you. Otherwise, suit the sliders labeled Matte Generation, Matte Cleanup, Spill Suppression, and Colour Correction. These volition tweak the mode in which your key is being removed.
Consider edits to your new background.
Make whatsoever necessary adjustments to the new background yous are adding to your video. If you're shooting a close-up interview, add together some depth of field by making the background slightly soft. "Call up, 'what would that background look like if it were really there when I shot it? How am I going to arrange for that?'" says Holtz.
Have it farther with creative greenish screens.
Look for small, fold-out background panels that resemble a circular section of dark-green screen. You can apply these to shoot keyable footage on the get. Hold the pop-up screen backside the person or object y'all want to shoot. In your video editor, cutting a uncomplicated matte (called a garbage matte) between the person and the border of the green area, and remove the groundwork beyond the line of the matte.
Anything solid in color tin can potentially be a screen for a keying project. Creative studio Abby Priest experimented to detect whether or non they could use liquid pigment as a green screen. Watch how they did it and meet the stunning outcome of their work.
Keep your eye on the latest tutorials and updates to Premiere Pro through resources like Adobe Live and try out new ways to employ Chroma Key tools in your videos. "Considering editing capabilities change every few months," explains Apley, "it's important to be continuously learning." As long every bit your lighting is ready up correctly, there are endless ways to innovate fascinating new backgrounds to your projects within the world of blush keying.

How To Put Images On Your Green Screen,
Source: https://www.adobe.com/creativecloud/video/discover/how-to-use-green-screen.html
Posted by: kenyonmovered40.blogspot.com
0 Response to "How To Put Images On Your Green Screen"
Post a Comment